How to Easily Upload Your VRChat Model and Work with It in Blender
You can use any 3D modeling software to create content for VRChat. A popular and free software is Blender. To get a 3D model or avatar into Blender, all you need is a 3D file type, usually an fbx. Importing an fbx object into Blender will allow you to edit that 3D file. Exporting the fbx object will update the file and let you upload to VRChat. An avatar fbx object will include information for rigging. You’ll be able to see the bones and blend shapes in Blender.
Import an FBX file into Blender
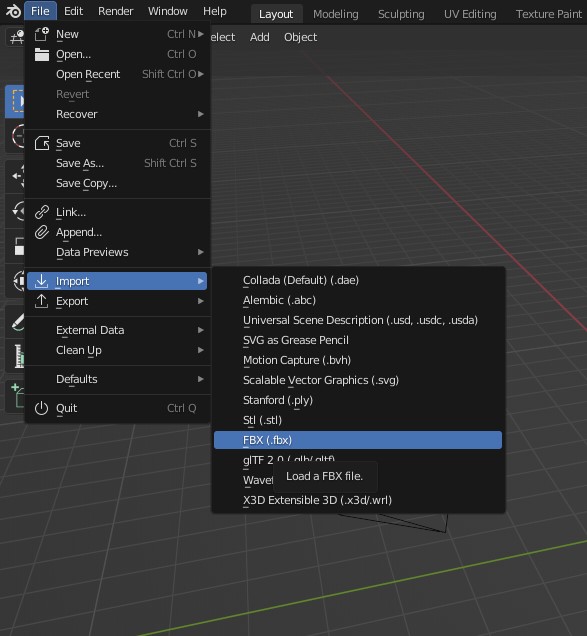
To import an fbx object, open Blender. In the top left corner, go to file -> import -> FBX.

Navigate to the saved file on your computer.
VRChat Avatars
People are usually referring to avatars when referencing Blender and VRChat. A lot of tools have been created to help players easily create avatars in Blender. If you are trying to edit an avatar, you should import the Cats Blender Plugin for VRChat. This plugin will help you rig your model, create visemes, and set up eye tracking for VRChat. There are also a ton of tutorials on Youtube showing how to use the plugin. A lot of the older tutorials are still relevant, just make sure you are using the current VRChat SDK and Unity version.
Import a Plugin into Blender
Download the Cats Blender Plugin. It should be a zip file on your PC.
Open Blender. In the top left of the program go to edit -> preferences.
In preferences, go to add-ons and then “Install…”, in the top right.
Navigate to the zip file containing the plugin and select it.
If you’re stepping into the world of VRChat, personalizing your experience with a custom VRChat model is an exciting way to stand out. Not only can you create a unique appearance, but you can also bring your VRChat model into Blender for further customization and animation. This article will guide you through the process of uploading your avatar to VRChat and importing your VRChat model to Blender, enhancing your virtual reality and 3D modeling skills.
Uploading Your VRChat Model
Ensuring compatibility with VRChat’s supported formats and adhering to polygon count limits will contribute to a smoother integration process and enhance performance within the VRChat environment. Now, let’s delve into the step-by-step guide to get your avatar ready for VRChat.
Step 1: Prepare Your Avatar
Before uploading your VRChat model, it’s essential to ensure it meets the platform’s requirements and is optimized for performance. Follow these guidelines:
- Model Format: VRChat supports models in FBX or VRM formats. Ensure your model is saved in one of these compatible formats;
- Polygon Count: Keep the polygon count within the recommended limits for optimal performance. VRChat typically suggests keeping the triangle count under 70,000 triangles.
Step 2: Import into Unity
VRChat utilizes the Unity engine for integrating models. Follow these steps to import your model into Unity:
- Download and Install Unity: Obtain the appropriate version of Unity for VRChat. As of now, Unity 2019.4.31f1 is commonly used for VRChat development;
- Install the VRChat SDK: Access the latest VRChat SDK from the official VRChat website. Import the SDK into your Unity project;
- Import Your Model: Drag and drop your model file into the Unity project to begin the integration process.
Step 3: Configure Your Model
After importing your model into Unity, it’s time to configure it according to VRChat’s specifications:
- Add an Avatar Descriptor: This is a crucial component provided by the VRChat SDK. It specifies important details such as the view position and playable layers for your avatar;
- Set Up Animation Overrides: If you desire custom animations for your avatar, set them up using the Animation Override Controller within Unity.
Step 4: Upload to VRChat
Once your VRChat model is fully configured within Unity, follow these steps to upload it to the VRChat platform:
- Log in to Your VRChat Account via the SDK: Use your VRChat credentials to access the platform via the SDK within Unity;
- Build & Publish: Follow the instructions provided in the SDK’s build control panel to initiate the process of uploading your avatar to VRChat’s servers.
Bringing Your VRChat Model into Blender

Before exporting your VRChat model from Unity to Blender, ensure you have the necessary files and dependencies ready for a seamless transition. Now, let’s proceed with the step-by-step guide.
Step 1: Export Your Model from Unity
To begin the process of editing your VRChat model in Blender, follow these steps to export it from Unity:
- Right-click Your VRChat Model: Navigate to your VRChat model located in Unity’s Asset folder;
- Select ‘Export as .FBX’: Right-click on your model and choose the option to export it as an .FBX file. Ensure to include all dependencies such as textures and rigging necessary for the model.
Step 2: Import into Blender
Once you have exported your model from Unity, proceed to import it into Blender using the following steps:
- Open Blender: Launch Blender on your computer;
- Navigate to ‘File’ > ‘Import’ > ‘FBX’: In Blender’s interface, go to the ‘File’ menu, select ‘Import’, and then choose ‘FBX’ from the options;
- Import Your .FBX File: Browse to the location where you saved your exported .FBX file from Unity and select it to import into Blender.
Step 3: Edit and Animate
Blender offers a wide range of tools and modes for editing and animating your VRChat model. Follow these guidelines to make modifications:
- Edit Mode: In Edit Mode, you can modify the mesh, adjust textures, and tweak materials to customize your VRChat model;
- Pose Mode: Utilize Pose Mode to manipulate the rig and pose or animate your avatar according to your preferences;
- Sculpt Mode: For detailed modifications and fine-tuning, use Sculpt Mode to sculpt your VRChat model to perfection, refining its appearance and details.
Practical Tips
When preparing your VRChat model, consider the following practical tips to ensure a smooth experience and optimal performance:
- Check Compatibility: Before uploading your model to VRChat, it’s crucial to verify its compatibility with the platform’s guidelines. This ensures that your model meets the necessary requirements and avoids any potential upload issues. Common compatibility factors to consider include supported file formats, polygon count limits, and rigging specifications;
- Optimize Textures: High-resolution textures can significantly impact performance within VRChat environments, leading to increased loading times and potential lag. To mitigate these issues, it’s recommended to optimize your textures by reducing their resolution. Aim for textures sized at 2048×2048 pixels or lower to maintain performance while preserving visual quality;
- Regular Backups: During the process of editing and refining your VRChat model, it’s essential to create regular backups to safeguard against data loss. Saving iterations of your model at key stages ensures that you can revert to previous versions if necessary, especially if unexpected errors or changes occur during the editing process. By maintaining a backup system, you can minimize the risk of losing progress and maintain control over your model’s development.
Conclusion
The fundamental instructions and advice in this article will help you upload and use your VRChat model in Blender. Regardless of your level of experience, following guidelines will enable you to maximize your VRChat model and guarantee a seamless and pleasurable virtual world experience.
FAQ
Yes, as long as it meets VRChat’s format and performance requirements. Convert your model to a compatible format if necessary.
Use the Animation Override Controller in Unity to assign custom animations to your VRChat model. Test animations within the VRChat SDK to confirm they function correctly.
Typical issues include missing textures or incorrect rigging. Ensure you export all necessary files and dependencies from Unity.
Optimize your VRChat model by reducing polygon counts and texture sizes. Avoid complex shaders and physics simulations that can strain performance.