
 Перекладач
I just uploaded another start to finish tutorial. This tutorial shows you how to create a small bedroom using Blender, Unity, and several 3D meshes. The world I made is available for download here.
In the YouTube description of the video, you can access download links that will help you follow along. You will also find timestamps for the video which will allow you to jump to specific points in the tutorial. Here, I’ll go over some of the major elements of building a VRChat world.
Building in Blender
You can build VR worlds in any 3D modeling software. You can even do it in Unity, using Unity cubes. Blender is a free 3D modeling software and it is very powerful. Its a very popular tool and there are tons of resources and tutorials on it. I highly recommend people use 3D modeling software, like Blender, to create their worlds. Blender gives you a ton of control, which makes it easy to model anything you want. You just need to learn how to use it.
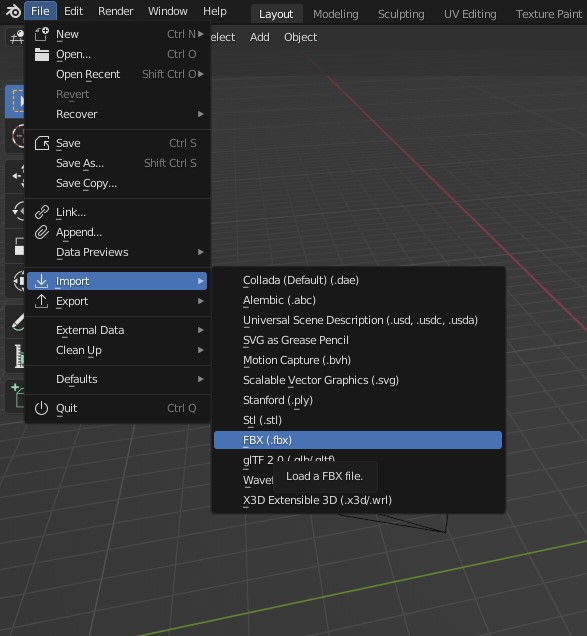
Import FBX
I like importing a 3D prop, like a couch, into my projects to begin. This model helps me scale the rest of the world properly. Other meshes can help you do this, like importing a 3D character. In the tutorial, I recommend people use the 3D bed that I share in the description of the video.
To import an FBX object into Blender, go to the top left of the project. Hit “File” – “Import” – “FBX”.
Check Face Orientation
Every plane of a 3D mesh has two sides. One side is being rendered while the other side, the backface, is not. For example, when you are looking at the default Blender cube, the six exterior sides of the cube are what you see, but if you look from inside the cube, all the faces would be invisible. The interior faces of that cube, are the all the backfaces.
Sometimes it can be difficult to tell which face is the backface, especially since Blender renders the backfaces by default. There are a couple ways to check this.
If you are viewing the project in solid viewport shading mode, you can manually turn off the backfaces, by selecting “backface culling” in the viewport shading options. This will make it so that every backface appears invisible.

The second way to view face orientation is to go to the “viewport overlays” options and check on “face orientation”.

This will make the backfaces appear red. If you have a red face, you can go into edit mode, select the face with face selection tool, and flip the normals.

UV Unwrapping
UV unwrapping is the process of flattening your 3D model onto a flat image. When you assign a material with a texture to an object, the UV unwrap will tell the program where the faces of the 3D object lay on the flat 2D texture image.
In the UV editor, you can see where the faces lay on the flat surface. By assigning seams and unwrapping, you can better lay out your UVs. UV unwrapping can be complicated for new 3D artists. It’s a necessary part of modeling and there are tons of resources online to help teach you how to unwrap properly.

What is VRChat Creator Companion?
The VRChat Creator Companion is VRChat’s new software that helps you create new projects and keep your older projects up to date. Download and learn more about the creator companion here.
Unity
Unity is a game engine, which allows people to make games. You must use the same Unity version that VRChat uses, in order to upload worlds to VRChat. To make sure you have the right Unity version installed on your computer, you can follow the directions from VRChat’s documenation.
Generate Lightmap UVs
Just like you need to UV unwrap models to display textures, you also need to UV unwrap to display lightmaps. Lightmaps are the lighting textures and data generated by baking lights. By default, Unity will use your second UV channel for lightmaps. Doing this manually goes beyond the scope of this beginners tutorial, so you don’t have to worry too much about it, for now. There is an easy way to generate lightmap UVs in Unity.
Navigate to your imported fbx files, usually in your assets folder somewhere. Select the fbx file you want to generate lightmap UVs for. In the Inspector (on the right), make sure you check on “Generate Lightmap UVs”. Then press apply.

How to Import Materials into Unity from Blender
There is no direct way to import your Blender materials into Unity. You will have to manually recreate each material in Unity.
Collisions
By default, 3D objects in your game engine will not collide with any other object in the scene, including players. You need to tell the program that you want players to collide with objects. To do this, you need to select the object in your scene, that you want collision added to. In the inspector, go to “add component” and type in “collider”. You can choose what kind of collider you want to add. Box collider creates a box around the mesh. Mesh collider uses the mesh as the collision information. Mesh collider is good for low poly meshes only. Adding a mesh collider to a high poly mesh will most likely cause performance to drop.

After adding a collider to an object, you can then change the size of the collider on the object by effecting its bounding volume.

How to Bake Lights in Unity
After you have set up your lighting in your scene, you then need to bake the lights. Baking lights will save the light data as textures overlaying your entire scene. This way you can avoid having real time lights in your, which would effect the players performance. Here is a tutorial on how to bake lights.
How to set up Post Processing
To set up Post Processing for your VRChat world, you need to first make sure you have it installed. First go to Windows->package manager. Find Post Processing and install it.

Add a Post Processing layer to your Main Camera. You will need to reference this main camera to your VRChat scene descriptor. This will tell the game to use the post processing parameters.
Once you have Post Processing Layer set up, you can create a new game object and set up your Post Processing Volume. For a full tutorial on how to set up Post Processing, here is a link to another tutorial.
How to Make a VRChat Mirror
By default, VRChat imports many prefabs that you can add to your scene. One of these prefabs is the VRCMirror prefab. If you are using VCC, you can find these in Packages -> com.vrchat.worlds -> samples -> UdonExampleScene -> Prefabs.
To set up a UI menu with working buttons, you’ll have to use the udon graph plugin, which comes installed when using VCC. For a drag and drop prefab that uses UI to enable and disable mirrors, you can download this from the VR.Space catalog.
Upload to VRChat
Uploading to VRChat is simple. Once you have a scene descriptor in your scene (you can get this by dragging in the VRCWorld prefab object into your scene), you can use the VRChat control panel to upload your project.
Just go to the “Builder” tab and press “Build & Publish for Windows”.


Recent Comments